Beyond Universal: Building a Custom TV Remote for the Flipper Zero
Ditch the .ir Files: Build a Faster, Custom Flipper Remote
The Flipper Zero is a powerful, pocket-sized multitool for hackers, makers, and anyone curious about the radio world around them. One of its most popular features is the infrared (IR) transceiver, which can learn, save, and emulate a vast array of remote controls. While the universal remote feature is fantastic for quick use, what happens when you want more control, a better user interface, or a deeper understanding of how it all works? You can find the complete source code for this project on GitHub
You build your own, of course.
This post is a deep dive into a custom-built Samsung TV remote application for the Flipper Zero. More than just a showcase, this project serves as a practical guide for anyone looking to move beyond .ir files and start hard-coding their own infrared commands. We'll explore how to design a unique user interface, handle complex navigation, and, most importantly, construct and transmit specific IR signals directly from C code.
Reimagining the Remote: A Vertical Approach
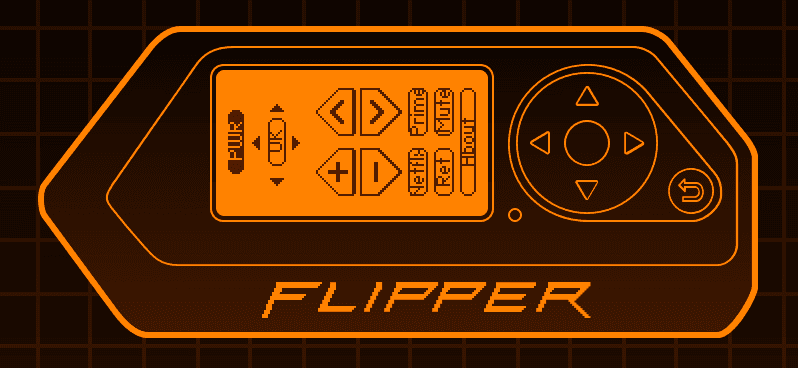
The first thing you'll notice about this remote is its unconventional layout. Instead of a standard horizontal interface, the UI is rotated +90 degrees.
Why? Ergonomics.
When you hold a traditional remote, you point the top at the TV. By rotating the Flipper's screen, we can hold it in the same natural way, with the IR port at the top pointing directly at the television. This makes using the remote feel more intuitive and less awkward than holding the device sideways.
This ergonomic choice presented a fun challenge: re-mapping the physical D-pad to match the rotated on-screen layout. In our final design:
- Physical Right moves the selection Down the remote.
- Physical Left moves the selection Up.
- Physical Up moves the selection Left across columns.
- Physical Down moves the selection Right across columns.
This custom input mapping is a key part of what makes a custom Flipper application so powerful—you can tailor the entire user experience to your specific needs.
A Tour of the Features
Before we dive into the code, let's look at what the final application does:
- Custom Graphical UI: Every element, from the D-pad icons to the volume rockers, is a custom PNG graphic. This gives the remote a polished, unique feel.
- Detailed Navigation: The navigation logic is intricate. You can move up and down the main column of buttons. When you land on a row with multiple buttons (like the Volume/Channel rockers), you can move left and right between them. The central "OK" button acts as a hub, allowing you to jump directly to the surrounding arrow keys.
- Haptic & Visual Feedback: Every time an IR command is sent, the Flipper vibrates and the notification LED blinks a satisfying magenta, giving you clear confirmation that your command was sent.
- Scrollable "About" Screen: A dedicated "About" button leads to a separate, scrollable screen where you can share information about the project, the author, and relevant links.
The Heart of the Matter: Sending Custom IR Commands
This project's main goal is to showcase how to send specific, known infrared commands without relying on saved .ir files. This is incredibly useful for creating compact, fast, and reliable applications for devices you use every day.
The magic happens in the send_ir_code function. Let's break down how it sends the "Power" command.
static void send_ir_code(TvButton button, NotificationApp* notifications) {
    // Provide haptic and visual feedback
    notification_message(notifications, &sequence_single_vibro);
    notification_message(notifications, &sequence_blink_magenta_10);

    // Define the IR protocol parameters
    uint8_t address = 0x07; // The standard address for most Samsung TVs
    uint8_t command;

    // Select the correct command code based on the button pressed
    switch(button) {
    case Button_Power:
        command = 0x02; // The specific hex code for the Samsung Power command
        break;
    // ... other cases for Volume Up, Channel Down, etc. ...
    }

    // --- This is the core IR sending logic ---

    // 1. Allocate memory for an InfraredSignal structure
    InfraredSignal* signal = infrared_signal_alloc();
    furi_check(signal); // Ensure allocation was successful

    // 2. Create an InfraredMessage with our parameters
    InfraredMessage message = {
        .protocol = InfraredProtocolSamsung32, // The protocol we're using
        .address = address,
        .command = command,
        .repeat = false
    };

    // 3. Assign the message to the signal structure
    infrared_signal_set_message(signal, &message);

    // 4. Transmit the signal via the Flipper's IR port
    infrared_signal_transmit(signal);

    // 5. Free the memory we allocated to prevent memory leaks
    infrared_signal_free(signal);

    // --- Cleanup ---
    furi_delay_ms(50); // A brief delay to make the LED blink visible
    notification_message(notifications, &sequence_reset_rgb); // Turn the LED off
}
This process is the key takeaway. By defining the protocol (InfraredProtocolSamsung32), address, and command, you can control any IR device whose codes you know. You can find these codes through online databases or by using the Flipper Zero's own IR reading capabilities to analyze your existing remotes.
What's Next?
This project is a starting point. Fork the repository on GitHub It's a template for you to build upon. You could:
Add more buttons for specific functions like "Source" or "Menu."
Create a system to switch between different device remotes (e.g., a TV, a soundbar, an Apple TV).
Experiment with different UI layouts and navigation schemes.
The Flipper Zero is an open book, and learning to write your own applications unlocks its true potential. We hope this deep dive has been informative and inspires you to start creating.
What will you build next?